System Overview
System Introduction
Overview
Risk control management is primarily used to handle functions related to margin configuration, limit management, and Margin Call within securities business. The main modules involved are as follows:

Business Operations Management
Credit Limits
The system currently provides two types of limits: financing limits and trading limits. Trading limits are granted to well‑cooperating institutional clients or cash accounts and may be used to trade when buying power is insufficient. Financing limits apply to margin accounts and are granted to users after a comprehensive assessment of the client's asset information; clients may utilize funds within the granted limit.
Financing Limit
About automatic credit granting:
If a client opens a margin account and subsequently performs a transfer of positions or a deposit, the system will automatically grant the client a certain credit limit to enable margin trading. The system supports an automatic credit mechanism (transfer settlement / deposit settlement). The consolidated automatic credit flow is as follows:
Credit Limit
Menu description: This menu is mainly used to query the credit limits of all credited clients; it also supports manually granting or adjusting credit limits upon client request.
Primary operation scenarios are as follows:
Adjusting client limits
- The list displays all financing credit clients. Opening the adjustment modal from the list page allows adjustment of limits for already credited clients.


Adjustment page
- Field descriptions:
- Confirm the "Adjusted Limit". Submission will create a corresponding record on the limit approval page for approval; see "Limit Approval ".
Creating a new credited client
- If a client has no assets credited, an uncredited client may be granted a limit individually via the list page's "Create Credited Client" action.

- Complete the required fields in the modal (if the client already exists in the credit list, the system will prompt during submission; client limits can be viewed in the main list).

- To grant credit to multiple clients at once, use the "Bulk New" operation at the top right of the list.

- Whether added individually or in bulk, submissions must be approved in the work order system. Only after approval can the client limits take effect.
Deleting credit limits for closed accounts
There may be cases where some client accounts have been closed but still count toward the company's total approved limit; such client limits can be manually deleted.
- Filter credited clients by closed status.

- Select and delete credited clients whose accounts have been closed.

Setting company limits
- Based on the consolidated client limits, if it is necessary to synchronously adjust company limits for overall control, access "Set Company Limits" from the top area of the page list to perform the operation.

- Company limit settings: When a tenant goes live, the system initializes default limits. Tenants may later customize these limits according to business requirements; modify each dimension via the page "Edit" operation. Changes must be approved through the work order process to take effect.

Company limit settings page
- Field descriptions
Credit Limit Revision
Menu description: This menu is primarily used to approve credit limit requests, including adjustments initiated by the backend or by clients.
- On the list page, use the "Submit for Review" action to open the approval modal.

- In the approval modal confirm the limit and add annotations. If the reviewer decides to reject the request, they may select "Reject" directly without submitting a work order.

Limit approval confirmation page
- Field descriptions
- After confirming the information, submit for approval. The approval will be processed in the work order system; only upon completion of that approval will the limit adjustment take effect.
Tips:
Work order approval flows can be configured based on limit ranges. The corresponding approval flow work order identifier is credit.credit_adjust.
Client FPS
Menu description: This menu is used to query clients' FPS values for margin financing credit (the initial FPS configuration can be viewed under "Business Parameter Settings" - "Risk Control" - "Credit Client Parameters") and to configure custom FPS rules (you may adjust the global FPS baseline by adding or subtracting values across defined dimensions).
Configuring FPS rules
- Click "Rule Configuration" on the page to open the rules page.

- Rule configuration: Set threshold values across client dimensions to increase or decrease the FPS value; once confirmed, the rule takes effect.

Credit Groups
Menu description: This menu is used to set up credit groups and manage group limits. Usage within a group must not exceed the group's limit. This feature is useful for grouping multiple accounts belonging to the same client (or related accounts such as spouses) under a shared group limit.
Main list page description
The list page allows viewing all credit groups and the total approved credit; each group's usage is also displayed. As follows:
- Total financing limit : the sum of all group limits for existing credit groups.
- Credit group details: supports editing group information and adding new accounts to the group; the group limit and usage are displayed, and if usage exceeds the group limit, the progress bar will show a red alert.
- Group account details: displays each group account's financing limit and usage; supports adjusting account limits within the group and removing accounts from the group.

Creating a credit group
- Create a new credit group via the illustrated operation.

- Fill in the credit group information. Accounts are not required at creation time and can be added later via "Add Account." Submit to create the group.

- If added group accounts already have limits, those limits will be automatically imported and may be adjusted.

- After creation, group information may be edited, accounts may be added/removed, and account limits within the group may be adjusted.

Credit Snapshots
Menu description: This menu is used to query each historical credit record for all clients. It is useful for precisely locating specific limit change events.

Credit snapshot query page
Bulk Update Limit
Menu description: This menu is used to perform bulk adjustments to clients' margin financing limits, primarily for periodic limit inspections by risk control. Clients targeted for bulk changes must be existing credited clients listed on the "Credit Limits" page.
Operation flow:
- Use "Import Credit" at the top right to initiate an import.

Bulk change page
- Import operation: complete the downloaded template according to its field requirements and upload the file; after confirming, a "Pending Confirmation" task will be created in the list page.

- For the list task, open "Details" to enter the secondary confirmation page for bulk client limit changes.

- The "Details" list displays all submitted credit records for confirmation. Individual client limits can be edited via "Edit" or removed via "Delete" if changes are not required.

- After verification, click "Bulk Adjust" at the top right to complete the batch adjustment.

Bulk change batch detail page
Client Financing
Financing Usage Details
Menu description: This menu displays all clients' financing details by currency for query purposes.

Financing usage details page
Exceed Credit Limit Details
Menu description: This menu displays details for all clients who have exceeded financing limits for query purposes.

Overlimit financing page
Trading Limit
Client Trading Limit
Menu description: This menu is used to query all clients who have been granted trading limits and supports creating, modifying, and activating/deactivating limits. Trading limits are included in clients' buying power and will automatically expire upon reaching their end date.
Operation flow:
- Use "Trading Limit Setting" to configure whether trading limits should automatically expire at Margin Call; automatic expiration is enabled by default and can be modified. Changes require work order approval to take effect.

- Use "New" or "Bulk Create" to add trading limits for clients.

- Configure the client trading limit, submit for approval per page requirements; submission records can be viewed in "Change Records". After work order approval, the record will be displayed in the "Client Trading Limits" list. Note: 1. A client may have only one trading limit type. 2. If a client already has the same type of trading limit, the system will default to overwrite with the newly added limit.

- Bulk create trading limits by downloading the template and completing it according to the template instructions, then uploading. The page will display the file parsing results. After work order approval, the records will be displayed in the "Client Trading Limits" list.

- Use "Edit" from the list page to modify a client's trading limit. The operation is the same as "New".

- For clients whose status is expired, modify the expiration date via "Edit" to reactivate the trading limit; to deactivate an active client's limit, use "Set as Invalid" from the list.

Update Records
Menu description: This menu allows users to view all change records for client trading limits.
Operation flow:
- After creating or editing a "Client Trading Limit", the record will appear on the "Update Records" page; use "Details" to view the approval details for a given trading limit record.

Debit Notification
Brokerage client accounts commonly use an aggregated buying power conversion mechanism to facilitate trading in non‑local currencies (for example, using HKD to trade USD‑denominated stocks). After a client executes such trades, the client's account may involve a currency borrowing position (the brokerage temporarily provides foreign currency to a foreign broker for trading). Subsequently the client needs to perform currency exchange operations. Therefore, preconfigured currency borrowing/exchange reminders can be incorporated into risk control management to notify clients to complete exchange tasks.
Business flow:

Client Notification
Menu description: This menu can query all clients requiring reminders, supports configuration of borrowing reminder rules, and supports manual currency exchanges.
Operation flow:
- Click "Conversion Rule" at the top right of the list to configure borrowing reminder rules.

- Conversion Rule: Single‑currency rules are optional; other fields are mandatory. Rules only execute when enabled.
- Mandatory fields for outstanding amounts and other currencies' withdrawable amounts default to the base currency; all currencies are converted to the base currency for calculation.
- A reminder triggers if either the single‑currency rule or the mandatory field rule is satisfied.
- Single‑currency rules may set different rules per currency; add and remove as needed.

- After configuring rules, enable and submit for work order review. Once approved, the system will execute the rule, retrieve clients matching the rule, and display results in the "Reminder Query" list. Additionally, the rule executes regularly on trading days and sends currency borrowing reminder messages to matching clients to prompt proactive exchanges. The page action "Fetch Exchange Users" refreshes the list and filters out clients that no longer meet the rule.

After enabling the rule, clients can also view an "Auto Repayment" function in the mobile app and opt in. If a client enables Auto Repayment and triggers the rule, the system will perform automatic exchanges or background manual conversion operations as configured.

App navigation: "Me" - "Settings" - "Account Preference" If "Auto-currency Conversion" is enabled in the App, the "Auto Convert" field displays as "Open" and supports the "Exchange" operation.  1. App "Auto Repayment"
- Exchange: Clients who enable Auto Repayment default to automatic system exchange; before the system executes automatic exchange, the page also supports manual exchange. The list "Details" action allows viewing real‑time client data, message history, and exchange records. The manual exchange modal shows the client's current cash situation and allows configuration of exchange amounts and currencies to confirm the exchange.


- Exchange result review: After manual/automatic exchange completes, if remaining assets still meet the rule conditions they will remain in the Reminder Query list; if they no longer meet the conditions they move to history, viewable under "History (link missing)". For exchange audit triggers or exchange failures, view exceptions on the "Exchange Exceptions" page (exchange audits require manual review under "Funds Management" - "Exchange" - "Client Exchange").

Notification History
Menu description: This menu is used to query historical clients who received reminders and related exchange details.

Currency borrowing reminder history page
Margin Call
When a client's net asset value falls below the maintenance margin level due to market fluctuations, the system will issue a Margin Call notice. The client must replenish funds or close positions within three trading days; otherwise the business has the right to liquidate positions on the client's behalf without prior notice.
Business flow:

Risk Alerts
Real‑time Alerts
Menu description: This menu supports real‑time margin alert monitoring.
- The list displays all current alert client records. The left area will show green real‑time update text (reflecting the latest computed results). The top area aggregates the totals for current margin call amounts and long‑standing unsettled margin call amounts.

Page basic field descriptions:
- For monitored alert clients, select a record to perform follow‑up actions: send message // liquidate positions // set automatic liquidation.

- When performing batch liquidation, you may choose whether to liquidate specific securities. Batch liquidation requires the liquidation toggle to be enabled in Business Parameter Settings.

- Configure automatic liquidation: define custom automatic liquidation timing; you may also adjust the deadlines for certain Margin Calls according to actual business needs.

- From a monitored alert record, click "Details" on the right side to view the client's fund summary, positions, and the list of securities currently subject to liquidation. The Details page supports "Liquidate" or "Send Message" operations.


- Edit remarks on current alert records for subsequent handling or reference by others. If marked as an exception, view the record under "Exception Orders" on the list page.


Intraday Financing Real‑time Alerts
Menu description: Functionality and operation logic are the same as "Real‑time Alerts," but the client scope is limited to intraday financing accounts.

History
Menu description: After a margin call ends, it is recorded in History. This menu allows viewing detailed historical margin call orders.
- Click "Details" on the list page to view detailed data before and after margin call triggering.

Snapshots
Menu description: When a client triggers a margin call, it is necessary to retain the historical data snapshot at the moment of trigger for traceability; such snapshots can serve as reference for operations (RO) or compliance reviews and as evidence for regulatory reporting. Therefore, margin call history requires snapshot data in certain scenarios.
Scenarios include: triggering a margin call / triggering a force call / triggering notification / daily scheduled record / ending a margin call.

Short Position Overview (Securities Lending Positions)
Menu description: When an IB cannot borrow financing, advance notice is required for stock recall or forced liquidation; correspondingly we must notify users for forced liquidation. This menu supports viewing overall securities lending usage and performing liquidation operations.
- View overall securities lending information on the list page.

- Click "Details" to view the clients corresponding to the shorted security.

- The Details page supports liquidation or sending a margin call message; operations are the same as in "Real‑time Alerts."

Non‑performing Credit Handling
Menu description: This menu is primarily used to query data for clients with non‑performing credit.

Stock Collections
Covered Options Stock Collection
Menu description: This menu displays records where the underlying stock for covered options is insufficient and shares need to be collected.
- The list displays all collection records.

- Click "Details" to further view the client's margin call details and support liquidation operations on options.

Short Stock Collection
Menu description: This menu displays records of short stocks that require collection (not updated in real time).
- The list displays all collection records.

- Click "Details" to further view the client's margin call details and support liquidation operations on short stocks.

Liquidation Orders
Menu description: This menu is used to view all liquidation records and, in the event of liquidation operation errors, to cancel orders.

Margin Requirements
The margin for equities is one of the risk control mechanisms used by brokers for HK/US stocks; it is used to calculate buying power, trigger margin calls, and other scenarios. Generally, stocks eligible for margin trading carry lower risk. This menu primarily provides margin configuration functionality.
Stock Margin
Long‑position Stock Margin
Menu description: This menu is mainly used to set margin ratios for long positions on stocks.
- The list displays the current configuration of all stock margin settings.

Long‑position stock margin main page
- Use the "New" button to add a single stock margin ratio (note: if the stock already exists in the system, the data will be overwritten by the current setting).


- Bulk set margin ratios by downloading the template, completing fields per instructions, and uploading the file.

- Whether added individually or via bulk upload, a record will be generated in "Setting Records." See the "Setting Records (link missing)" menu.
- To modify an existing stock margin ratio, use "Edit" from the list; to delete a stock margin setting, use "Delete."

- Stock status may change; use "Fetch Stock Status" at the top right of the list to refresh to the latest status.

Intraday Trading Real‑time Margin
Menu description: For intraday financing business, margin ratios for stocks that support intraday trading can be configured separately.
- The list displays all margin ratio records for stocks that support intraday trading. The system automatically adjusts margin status based on trading sessions. Related rules are configurable via "Rule Settings" on this page.

- Use "Add" and "Bulk Upload" to add intraday trading margin ratio settings individually or in bulk; operation flow is the same as "Stock Margin".

- Use "Edit" or "Delete" in the records' right‑side operation area.


Note: If a record's status is "Expired," the margin ratio defaults to 100%.
Setting Records
Menu description: This menu is used to view setting records for Stock Margin and Intraday Trading Real‑time Margin, and to perform manual synchronization or cancel synchronization operations.
- When a Stock Margin or Intraday Trading Real‑time Margin record is added or edited and submitted, a pending setting record is created. You may click "Cancel Sync" to cancel the setting (no record generated), or click "Sync" to mark the record as triggered, which will create a stock margin record on the main page (if the stock already exists the original record will be updated). Clicking "Cancel Sync" changes the record status to "Revoked" and the setting will not take effect. If no manual synchronization is performed, the system will apply the setting within the configured effective period.

Short‑sell Margin
Menu description: For short‑sell business, margin ratios for stocks that support short selling can be configured separately.
- The list displays all records of margin ratios for stocks that support short selling.

- Supports bulk upload: download the template, complete it according to the file requirements, and upload.

- Use "Edit" from the record area to modify a record. Sellable status description: There are three statuses:
- Sellable: sufficient securities lending inventory; the stock supports short selling.
- Prohibited: manually set to prohibit short selling; the stock does not support securities lending.
- System Auto‑prohibited: if a manual securities lending inventory threshold rule is set, when inventory meets the automatic closure rule the system will automatically prohibit short selling. From the client's perspective the stock supports securities lending but inventory is insufficient to execute short selling. If automatic recovery conditions are met, the system will restore "Sellable."

Tips:
For securities lending inventory rules: the automatic recovery threshold must be greater than or equal to the automatic closure threshold.
- Click "Change Records" on the page to view the historical change log for all short‑sell margin settings.

Client Margin
Long‑position Stocks
Menu description: This menu allows configuring client‑specific margin ratios for long‑position stocks; when calculating margin, client‑specific settings take priority.
- The list displays all client long‑position stock margin settings.

- Create client margin: click "New" to open the creation modal. Client and stock selections support single client/stock and client group/stock group selection (client groups are configurable under "Risk Control Management" - "List Management" - "Client Groups"; stock groups are configurable under "Business Parameter Settings" - "Risk Control" - "Stock Groups"). Complete the configuration and submit to create.


- You may also import client margin data via "Import Margin Data": download the template in the modal, complete it per instructions, and upload.

- After file upload and confirmation, a "Pending Activation" record will be generated in the client margin list. To modify a margin ratio use "Edit"; to deactivate a client margin setting use "Set to Expired".

- To view the client's long‑position margin setting history, click "Change Records" on the page.

Short‑position Stocks
Client short‑position margin configuration logic is the same as for long‑position stocks, with the addition of "sellable status" and securities lending inventory rule configuration. Sellable status and inventory rule logic are the same as on the "Short‑sell Margin" page.

Options
Option Exercise
Menu description: This menu is primarily used to view an overview of option exercise dates and related data, to inspect specific options, and to perform exercise operations.
- The list displays an aggregated overview of option exercise date data.

- Use "Details" to view the exercise status of all options.


- To change an option type, use the "Edit" modal in the respective tab.

- To exercise a specific option for all clients, use the "Exercise" action from the list.

- To view all clients under a specific option and exercise on a per‑client basis, use the "View Details" page.


Exercise Records
Menu description: This page is used to view records and details resulting from option expiration exercises or expirations where exercise was waived.

Near‑expiry Options
Menu description: This page is used to review the holding lists of clients with options approaching expiry.

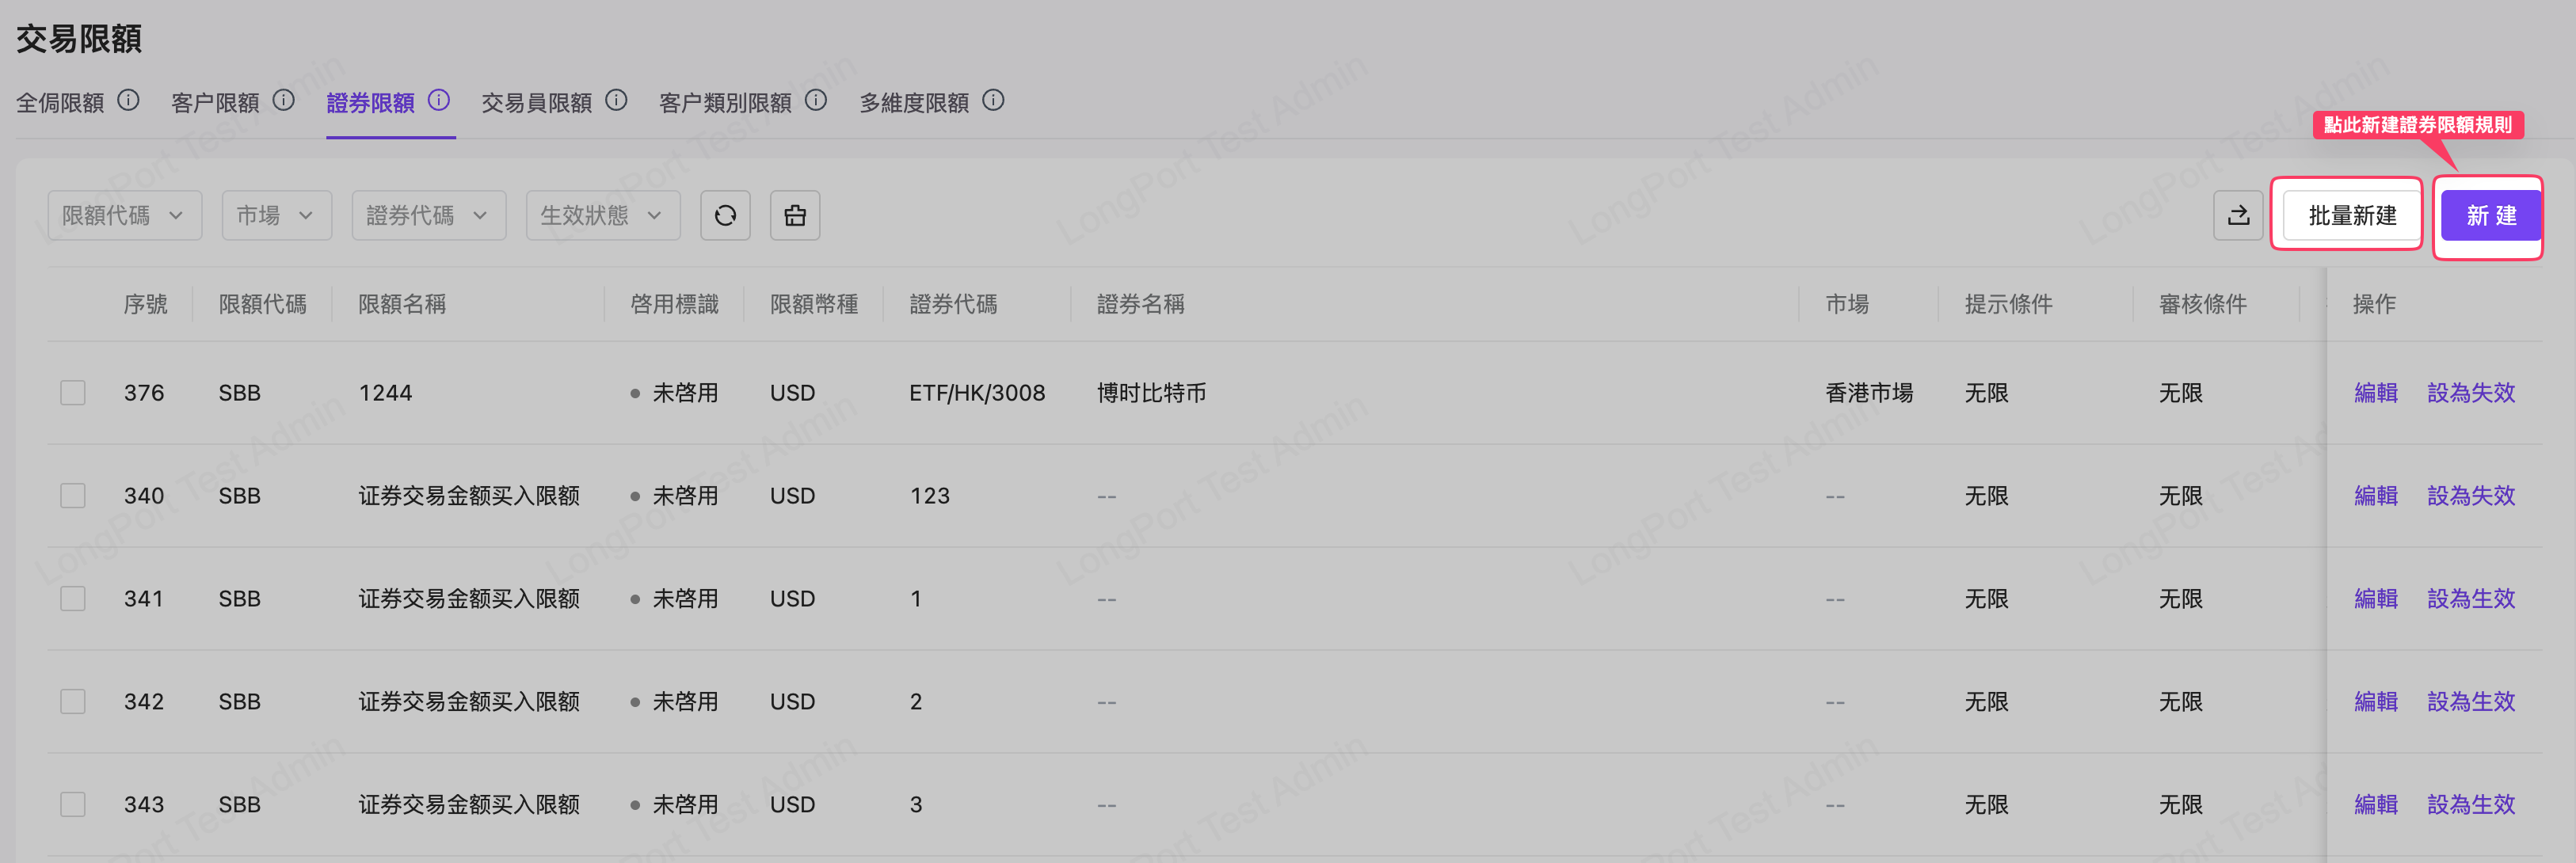
Trading Limits
This menu provides a comprehensive dimension for managing trading limits, including company‑level, client‑level, security‑level, and trader‑level controls.
- Restrict company‑wide daily limits, all clients' daily limits, and all securities' daily trading limits.
- Set trading limits for single or multiple clients.
- Set trading limits for single or multiple securities.
- Configure trader limits to prompt, require approval, or reject.
- Priority order: Client Limit / Security Limit / Trader Limit / Client Category Limit / Multi‑dimension Limit > Global Limit.
Global Limits
Menu description: This menu displays all limit codes. To create a new limit code (if current codes do not support the rule), contact the platform provider.
- Use the "Enable" and "Disable" actions in the list to activate/deactivate corresponding limits.

- You may also edit limit rules.

Key fields:
Rule changes require work order approval to take effect.
Client Limits
Menu description: Client limits support only limit codes of type "Client" in Global Limits and support single or bulk creation of client limit rules.
- Create new client limit rules.

- Client limit rule configuration: supports single client entry and bulk upload; the limit name is customizable. Rules require work order approval to take effect.

Create new client limit
Note: Selecting a limit code will display the code's enable status, which reflects the Global Limits code status. Modifying the status here may also update the global code status.
- Bulk create client limits by completing the template per instructions and uploading.

- To modify client limit rules or change rule status, use "Edit", "Set to Active", or "Set to Inactive" in the list operations. Edits require work order approval to take effect.

Security Limits
Menu description: Security limits support only limit codes of type "Security" in Global Limits and support single or bulk creation of security limit rules.
- Create new security limit rules.
- Security limit rule configuration: supports single security code entry and bulk upload creation; the limit name is customizable. Rules require work order approval to take effect.

Note: Selecting a limit code shows the code's enable status reflecting the Global Limits code status. Modifying the status here may also update the global code status.
- Bulk create security limits by completing the template per instructions and uploading.

- To modify security limit rules or change rule status, use "Edit", "Set to Active", or "Set to Inactive" in the list operations; edits require work order approval to take effect. Same as "Client Limits."
Trader Limits
Menu description: Trader limits support only limit codes of type "Trader" in Global Limits.
- Create new trader limit rules.

- Trader limit rule configuration: the limit name is customizable; rules require work order approval to take effect.

Note: Selecting a limit code displays the code's enable status, mirroring the Global Limits code status. Modifying the status here may also update the global code status.
- To modify trader limit rules or change rule status, use "Edit", "Set to Active", or "Set to Inactive"; edits require work order approval to take effect. Same as "Client Limits."
Client Category Limits
Menu description: Client category limits support only limit codes of type "Client" in Global Limits.
- Create client category limit rules.

- Client category limit configuration: the limit name is customizable; rules require work order approval to take effect.

Note: Selecting a limit code displays the code's enable status reflecting the Global Limits code status. Modifying the status here may also update the global code status.
- Bulk create security limits by completing the template per instructions and uploading.

- To modify client category limit rules or change rule status, use "Edit", "Set to Active", or "Set to Inactive" in the list operations; edits require work order approval to take effect. Same as "Client Limits."
Multi‑dimension Limits
Menu description: Multi‑dimension limits support only limit codes of type "Multi‑dimension" in Global Limits.
- Create new multi‑dimension limit rules.

- Multi‑dimension limit rule configuration: the limit name is customizable; rules require work order approval to take effect.

Note: Selecting a limit code displays the code's enable status reflecting the Global Limits code status. Modifying the status here may also update the global code status.
- To modify multi‑dimension limit rules or change rule status, use "Edit", "Set to Active", or "Set to Inactive"; edits require work order approval to take effect.
List Management
Blacklist
Menu description: The list page displays current blacklist entries. Blacklist application scenarios include credit granting and asset transfers. Clients with the business tag "Credit" will not receive automatic credit, and credit adjustment requests will require manual review; clients with the business tag "Asset Transfer" are not supported for buying power transfers.
- List page

- Click "New" to add a blacklisted client.
- List dimension: supports securities account and client ID. Selecting securities account applies only to the specified account; selecting client ID applies to all accounts under that client.
- Business tags: support configuration of different blacklist business tags. The system supports "Credit" and "Asset Transfer" tags. You may select both tags simultaneously; records will be generated separately per business tag.

- For large volumes of blacklist entries, use bulk upload per template instructions.

- To temporarily disable a blacklist entry, select "Disable" in the Action column; to reenable, select "Enable". To permanently remove the entry, select "Delete."

Client Groups
Menu description: This menu supports configuring client groups, which may be referenced in other business scenarios. Current applications include margin and reporting; to apply client groups elsewhere, contact support.
- Create a client group: select the business type for which the group will be used, enter a custom group name, and submit to create.


- Add accounts to the group: after creating a client group, a record is generated in the main list. Click "Details" to add accounts to the group via "New" or "Bulk Import."


- Manage group accounts: group accounts support "Delete."

- Manage client groups: groups support "Edit" and "Delete."

Stress Testing
Stress testing related to SFC margin guidelines and monitoring associated with stocks and clients.
Margin Call Stress Testing
Test Details
Menu description: This menu supports creating conditions to calculate Margin Call alerts / non‑frozen capital surpluses. Each simulation is assigned a task ID; upon expected completion, the task ID's execution status and calculation details may be queried.
- Create a new simulation: the system supports three pre‑calculation modes—stock group / stock market / single stock—and supports applying exemption rules to a stress test batch. Choose the simulation type and calculation content and submit to start the simulation.

Note: Configure related exemption rules under "System Settings" > "Risk Control" > "Risk Control Parameters."
- When the calculation completes, click "Details" in the record's operation area to view the results.

- The "Details" page results can be used to evaluate whether the simulation meets expectations. If both margin call and non‑frozen capital surplus simulations are run, they will be presented in two separate lists.

Custom Data
Menu description: This menu maintains stock margin ratios by importing margin ratio documents in batches.
- Import margin ratios per the template; upon successful import they will be displayed in the list page.

Index Management
Index Levels
Menu description: This menu is used to maintain index levels referenced in brokerage margin guidelines.
- Click "New" to create an index level.

- To modify an index level, use "Edit" on the list page; to deactivate or remove, use "Delete."

- Initialize data by selecting "Initialize Data" on the left area to populate the system with preset index data (initializes nine SFC margin guideline indices and levels). Initialization does not affect user‑added index data.
Stock Index
Menu description: This menu is used to maintain stock indices referenced in brokerage margin guidelines.
- The page provides a "Fetch Base Data" function to synchronize market data automatically (this data is provided as the market data source for the Whale product).

- If the broker has a preferred market data source, bulk import is supported via "Bulk Import", with a template available for download.

- To modify an index code, use "Edit" from the list; to remove or deactivate, use "Delete."

Stock Level Weighting
Menu description: This menu displays stock level weightings and supports margin call simulation calculations.
- Stock level weighting list.

- The default three index decline rates are precomputed on the page; you may modify them manually using the "Simulate Margin Call" function to trigger a simulation.

Haircut Management
According to FRR reports and other financial reporting requirements, the discounted value of collateral must be calculated.
Stock Haircut Management
Menu description: This menu is primarily used to manage stock haircuts.
- The list displays all stocks for which haircuts have been configured.

- Click "Add Stock Haircut" to add a stock haircut record.

- Use "Edit" in the record area to modify a stock's haircut value.

- The page also supports bulk import of haircuts via "Bulk Import": download the template, enter data per format, and import.

Index Haircut
Menu description: Index operations are the same as stock haircut operations but do not support bulk import.

Haircut Modification Records
Menu description: This menu is used to query all haircut modification records.

Haircut modification record list page
Liquid Capital Shortfall
Business Description
This feature simulates SFC requirements to perform stress testing on liquid capital in order to determine whether the Top 10 stock concentration meets regulatory requirements.
Definitions
Liquid Capital Shortfall
- The list displays historical calculation tasks that have been created.

Historical task list
- Click "New" to create a new calculation task; you will need to manually input liquid capital data.

Create a test task
- After creation, click "Details" to view the calculation task.

View calculation results
Client Shortfall Details
- Calculation tasks complete in about 1–5 minutes. Once complete, view the calculation results; the client shortfall details are presented first.

Shortfall details
- Click "Details" to view the client's position details and the recognized asset values of holdings.

Position details
Top 10 Stocks
- First part: LC data.
The system derives ELC‑related data (liquid capital surplus) from LC and RLC information provided by the finance department.

LC data
- Second part: Liquid capital shortfall
This data simulates shortfall results when collateral declines by x and compares whether a buffer remains.
Buffer = 50% of liquid capital surplus - liquid capital shortfall

Liquid capital shortfall
Stock decline x is a variable determined according to margin guideline rules, detailed as follows:
Calculate by market value and classify holdings by level to compute proportion; based on the composition of collateral securities, apply appropriate hypothetical stress tests. Calculations can be performed once after market close each trading day.
(a) If level‑1 collateral proportion exceeds 75% (by market value), the average price decline equals parameter a.
(b) If the combined proportion of level‑1 and level‑2 collateral exceeds 75% (by market value), the average price decline equals parameter b.
(c) If the combined proportion of level‑1 and level‑2 collateral is between 25% and 75% (by market value), the average price decline equals parameter c.
(d) If the combined proportion of level‑1 and level‑2 collateral is below 25% (by market value), the average price decline equals parameter d.
- Third part: Liquid capital shortfall
This section simulates each collateral becoming non‑pledgeable and the impact on shortfall; it ranks the top 10 stocks by the magnitude of shortfall impact.

Top 10 stocks
Position Details
Consolidate position details for all indebted clients as the data source for shortfall calculations.

Position details